![buildwitt-logo-light.svg]](https://info.buildwitt.com/hubfs/2022%20-%20BuildWitt/buildwitt-logo-light.svg)
The SFTP (Secure File Transfer Protocol) integration allows your team to automatically sync employee data from your HRIS into BuildWitt Improve. Rather than manually managing user accounts, your system sends a structured employee file to a secure server, and BuildWitt handles the rest, keeping your team roster up to date on a daily basis.
This integration is ideal for organizations whose HRIS doesn't have a direct native connection to BuildWitt but can export employee data as a CSV file.
Before You Begin- Make sure your HRIS system can export employee data as a .csv file
- Decide which upload path fits your organization:
| Manual Upload | Automated Upload | |
| Best for | Teams without IT resources or a one-time setup |
Organizations wanting hands-free, daily syncing
|
| How it Works | You export a .csv from your HRIS and upload it manually via BuildWitt Account | Your HRIS or IT team configures an automatic push to the SFTP server on a schedule |
| Ongoing Effort | Requires a manual upload each time you want to sync | Runs automatically once configured |
Not sure which path to take? If your HRIS supports scheduled exports, the automated path is recommended. Otherwise, start with manual.
Step 1 — Prepare Your Employee Data File
Your IT or HR team will need to prepare a CSV file that matches the BuildWitt SFTP format. Critical: The file must be named HRIS.csv exactly. Any variation in the file name will cause the sync to fail.
Avoiding Upload Conflicts: Before uploading your employee file via SFTP, check for duplicate email addresses, phone numbers, or employee codes across records. Any duplicates in these fields will create a conflict, and the affected user(s) will not be created. We recommend reviewing your source file for duplicates on the front end before submitting the full upload to avoid missing users.
Additionally, employee_id must remain constant once assigned — it should never be reassigned or modified for an existing employee. Since employee_id maps to the remote_id used for identity matching, changing it (e.g. switching from a system-generated ID to the employee number, or vice versa) causes the system to treat the record as a new employee rather than an update. This orphans the old mapping and can create duplicate records and sync conflicts.
Fields:
|
Field |
Required |
Notes |
Mapped to in BuildWitt Account |
|
employee_id* |
✅ |
Native identifier directly from the source HRIS. Must be unique and immutable |
|
|
employee_number* |
✅ |
Company assigned identification number used for payroll, timekeeping, or other internal processes. |
Employee Code |
|
first_name* |
✅ | First Name |
First Name |
|
last_name* |
✅ | Last Name |
Last Name |
|
username |
Leave Blank |
N/A |
|
|
work_email* |
✅ | Work Email |
|
|
personal_email |
Personal Email |
Email (work email takes priority) |
|
|
mobile_phone_number* |
✅ | Mobile Phone Number |
Phone Number |
|
manager_id |
Must match employee_id for the Supervisor and Supervisor must be included in the spreadsheet. | Supervisor | |
|
start_date |
|
Employee Hire Date |
Hire Date |
|
employment_status |
✅ |
Must be Active or Inactive |
|
|
company_id |
Leave Blank or use as custom_field1 | Custom Field 1 | |
|
company_legal_name |
Leave Blank or use as custom_field2 | Custom Field 2 | |
|
company_display_name |
Leave Blank or use as custom_field3 | Custom Field 3 | |
|
employment_id |
✅ | Unique job/position ID | N/A |
|
job_title |
✅ | Job Title |
Job Title |
|
group_id |
|
This functions as the unique identifier for the employee's department, division, or other organizational group. |
|
|
group_name |
|
This is the name of the employee's department or division |
Division |
|
group_type |
|
Group_Type identifies the type of organizational grouping (for example, Department, Division, or Team). It is primarily used when organizations choose to sync only specific group types. If your organization has a single grouping type, using a default value such as Department or Division works well. |
|
Step 2 — Enable the Integration in BuildWitt Accounts
-
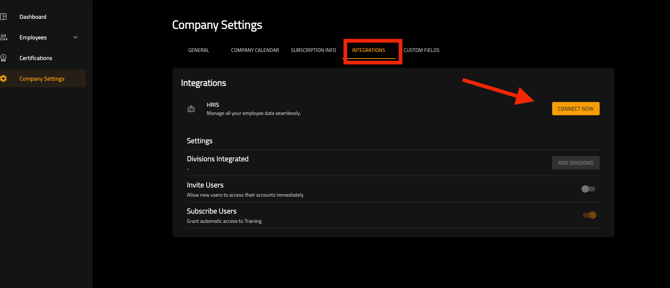
From account.buildwitt.com navigate to Company Settings>Integrations
-
Select Connect Now
-
Note: The Generic SFTP integration must be enabled by your Customer Success Manager before it will appear as an available option.
-
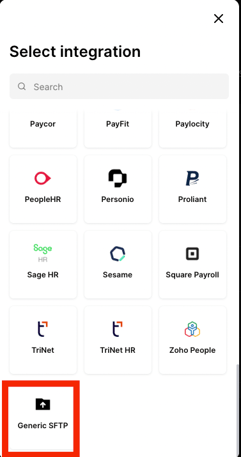
- In the Connect Now window, select Generic SFTP
-
Choose how you want to upload your employee data:
- Manual Upload – Upload a .csv file manually. After the upload is complete, proceed to the Division Setup step before employee records begin syncing.
- Scheduled Recurring CSV – Configure an SFTP connection to automatically import your employee CSV on a recurring schedule.
Once your BuildWitt CSM has completed the setup on the BuildWitt side, you'll receive a set of SFTP credentials to configure in your HRIS or share with your IT team:
-
-
- SFTP Host — the server address to connect to
- SFTP Username
- SFTP Password or SSH Key
-
Your IT team will use these credentials to configure your HRIS to push the HRIS.csv file to the SFTP server on your agreed schedule.
If your organization requires Merge's security certifications, you can request access directly at Merge Trust Center
Step 3 — Upload Your Employee File (First Sync)
Once credentials are in place:
- Your HRIS/IT team uploads the HRIS.csv to the Merge SFTP server
- The first sync is a full pull — all employee records in the file will be imported
- Processing typically occurs overnight (default sync runs daily at 3:00 AM ET)
- Your BuildWitt CSM will confirm when the initial sync is complete and validate the data with you
Step 4 — Validate Your Employee Data
After the first sync, your CSM will work with you to confirm:
- Total employee count matches your expected headcount
- Employee fields are mapped correctly (name, email, phone, job title, department, start date)
- Active employees show as Active in BuildWitt Improve
- No unexpected duplicates exist
Step 5 — Configure Your Ongoing Sync Schedule
Once validation is complete, your IT team will configure your HRIS to automatically push HRIS.csv to the SFTP server on the agreed schedule (default: daily at 3:00 AM ET).
After the first full sync, all subsequent syncs are delta-based — meaning only new hires, terminations, and changed records are processed, keeping things efficient.
What happens automatically with each sync:
- New employees in the file are added to BuildWitt Improve
- Updated employee records (name, title, department, etc.) are reflected
- Terminated/inactive employees are archived in BuildWitt
Important Notes
Manual user additions
Admins can still manually add users before the integration runs (e.g., for pre-start-date onboarding). Once the integration is live, avoid manually setting a Hire Date — the integration manages that field.
Inactive employees
Terminated employees included in your file as Inactive will be archived in BuildWitt. They remain in the system but won't have active access.
File naming:
HRIS.csv — no variations.
Ongoing Support
Once your integration is live
- Submit any issues or enhancement requests to support@buildwitt.com or the BuildWitt Product Portal
- Your CSM will monitor syncs closely during the first 30 days post-launch to ensure everything is running smoothly
- Questions about the setup process? Reach out to your BuildWitt Customer Success Manager directly